Released worldwide on Saturday 1st August 2020, the LEGO Nintendo Entertainment System was something I really wanted to add to our ever-growing Nintendo LEGO collection. Whilst not technically part of the Lego Super Mario range, from the moment I’d seen the Official Trailer for this product, I knew we needed to clear some diary space and some shelf space for this marvel of grey plastic bricks.
Unfortunately, diary space wouldn’t actually be cleared until October 2022. Upon release the LEGO NES retailed for a hefty £209.99 so after patiently waiting and watching for sales and offers, we finally purchased our set at the end of January 2022 and if would be a further nine months until we managed to lay the first brick…
Since receiving my first LEGO set for Christmas 1988 (Fabuland Amusement Park 3683) I have loved building Lego and I also love that my kids have the same passion for constructing as me. We build most of our LEGO Super Mario sets together and have spent many hours rethinking levels for Mario to navigate. However, sometimes…just sometimes…a LEGO build needs to be strictly grown-ups only. This was most definitely one of those sometimes. Now, having young children and limited opportunities, we need to be extremely careful about when we activate Operation Babysitter (my parents usually need a good couple of months to recover from each of these events). So time went on and the large box (58 x 47.7 x 12.1 cm to be precise) continued to reside in its temporary home behind the armchair, regularly taunting me from my peripheral vision as I used my PC in the back of the room. Finally October came, bringing with it a (thankfully mild) case of COVID-19 for both Jef and myself. As we were both symptomatic we weren’t able to go into work for several days (as per our workplace’s COVID-19 guidance at the time) however (as per our children’s school’s COVID-19 guidance at the time), the kids could attend school as long as they remained symptom free (which they did). The LEGO gods were obviously smiling on us as we shipped the little ones off to school and finally opened the LEGO NES box.
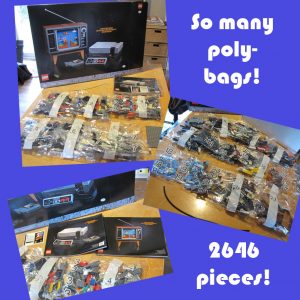
Inside the box there was an impressive 26 individual polybags, two hefty instruction manuals, two plastic rods and a small sticker sheet.
Looking at the first of the two manuals, bags 1-8 were required to build the NES console itself, the controller and the game cartridge which had been thoughtfully included…
We set to work…
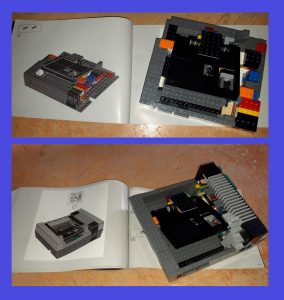
If you have ever built a LEGO set you will know how well written (drawn?) the manuals are and these ones were no exception. The step-by-step instructions were clear and easy to follow and the base of the console quickly began to take shape. Inside the model there was an interesting use of coloured bricks which I assumed was to help with construction rather than being an imitation of the colours seen inside the real console.
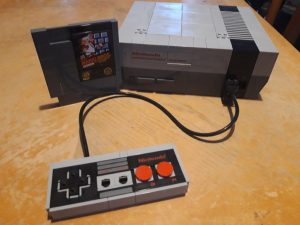
The outside however was the classic two-tone grey and black of the original and once built looked pretty convincing. As far as I could tell the console was made entirely of pre-existing LEGO bricks with the only specialised parts being six flat tiles which had been custom-printed with text seen on the front of the console. This was also the case with the controller which had a total of 12 flat tiles with custom-printed text. The cartridge had no custom pieces with LEGO opting for two full colour stickers of the chosen title; Super Mario Bros.
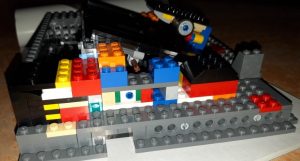
One of the most interesting parts of building the console was the internal mechanism which would allow the game cartridge to be inserted and ejected just like the real NES! This was also one of the most fiddley parts taking the most time to complete. Despite the complexity of this part of the build, the mechanism it created was pleasingly simple. The platform on which the game cartridge would rest was supported by two Technic shock absorbers which allowed it to be pressed down and then return to its original position. It also made use of a Technic cross axle, a Technic cross block and a cross axle w/end stop. These three pieces effectively made a sliding pin which moved back and forth as the platform was pushed down and up. The final part that allowed the platform to remain in a ‘down’ position was the clever use of a brick inv. bow. This is a brick with a curve and cut out on its underside which allowed the protruding cross axle piece to slide and lock into place, holding the platform down until it is pressed again when it springs back to its original position.
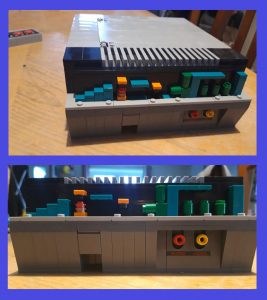
Another interesting addition is the hidden Mario level concealed within the right-hand side of the console. When initially building this I wondered if it was extra ports or connectors and it wasn’t until it was completed that I realised it was a little diorama of an old side scrolling Mario level; a nice touch.
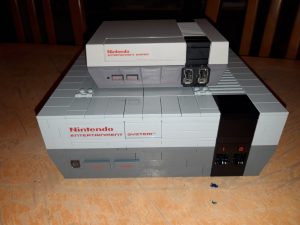
The finished piece looked pretty true to the console, but as we don’t currently have an original NES I looked up some stats. Weighing in at 0.94kg, the LEGO NES is 1.33kg lighter than the original and its dimensions are slightly smaller overall. The same could also be said for the controller and cartridge, but even so we were very pleased to add it to our LEGO Super Mario collection. For anyone who’s interested the full measurement comparisons are below (Original NES dimensions were obtained here; LEGO NES dimensions were taken using my trusty measuring tape and kitchen scales).
| Original NES | LEGO NES | |
| Console Height (mm) | 88.9 | 73.0 |
| Console Width (mm) | 256.0 | 207.0 |
| Console Depth (mm) | 203.2 | 75.0 |
| Console Weight (kg) | 2.27 | 0.94 |
| Controller Height (mm) | 53.2 | 51.0 |
| Controller Width (mm) | 123.4 | 125.5 |
| Controller Depth (mm) | 17.5 | 15.0 |
| Controller Weight (kg) | 0.07 | 0.09 |
| Cartridge Height (mm) | 133.0 | 103.0 |
| Cartridge Width (mm) | 120.0 | 95.0 |
| Cartridge Depth (mm) | 20.0 | 9.5 |
| Cartridge Weight (kg) | 0.65 | 0.06 |
The console, controller and cart took us a total of three build sessions (each consisting of between one and two hours) and the finished piece was well worth the work. We were both also well enough to return to work meaning the rest of the set; the old-school TV with scrolling Mario level; remains firmly in the box waiting for our next child-free brick building adventure!