There are several reasons that you might want to dismantle an N64 cartridge; to clean it…to check its authenticity…to change a dead button cell battery…because you simply love looking at PCBs…
Well whatever the reason, it is an easy thing to do (provided you have the correct screwdrivers), but if you’ve not done it before it can seem quite daunting.
If this sounds like you, read on for my simple guide to the N64 cartridge teardown…
Following the purchase of our latest N64 game a few weeks ago I was cleaning and cataloguing the cart which is common practice for us; partly to have a well maintained collection and partly to check the authenticity of each game we buy (something which I feel is particularly important for some of the more pricey titles). As I confidently unscrewed, unclipped and cleaned it occurred to me that whilst I could now complete this task with ease, that was not always the case. I remember the first time we ever took a cartridge apart and how terrified I was of losing pieces or damaging the game (It definitely stuck with me as I remember it was NBA Hang Time; in no way a particularly valuable or rare cart, but I was so scared of destroying it!).
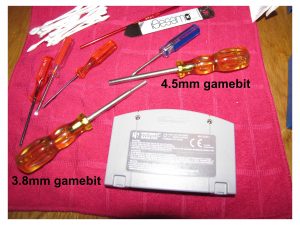
All N64 carts; whether they are European (PAL), North American (NTSC-U), or Japanese (NTSC-J); are held together using two 3.8mm security screws for which you will need a 3.8mm gamebit screwdriver to unscrew. These are relatively easy to get hold of online; we bought ours from eBay back in 2015 at £3.49 for two (one 3.8mm for Nintendo cartridges & some handhelds and one 4.5mm for Sega cartridges & most consoles).
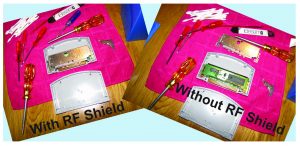
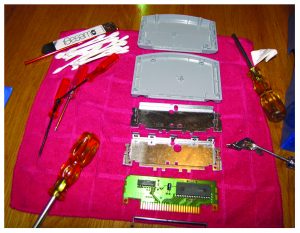
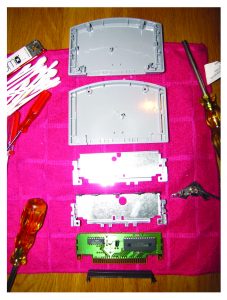
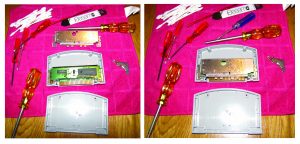
Once you have removed the two security screws, the the cart will easily come apart; you just have to unhook the two plastic clips at the bottom and you are able to separate the two halves. The inside the front half is just grey plastic with a small peg roughly in the centre. Attached to the back half is the PCB consealed within an RF shield, which is held in place using two standard crosshead screws. Once these are removed you need to unclip the the front part of the RF shield. This is held together more firmly that the plastic hooks on the cart itself, in five places and requires a firm pull upwards to remove.
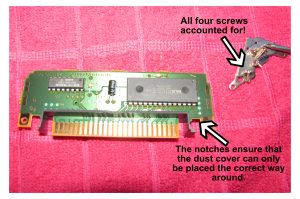
Underneath is the PCB, the other half of the RF shield and a shaped piece of black plastic which slides over the pin part of the PCB and acts as a dust or debris guard for the cart. You can now lift out the PCB, slide off the dust guard and remove the other half of the RF shield. Once these parts are removed, the back half of the cart looks similar to the front, with a similar little plastic peg close to its centre. Now your cart is apart, you should firstly check all four screws are accounted for (I usually use a blob of Blu Tack or magnet to keep track of these). You may also choose to clean or check the authenticity of your cart or, if you’re feeling brave change a battery (both cart cleaning and cart authenticity have been covered in previous posts in the Watch & Game section and I will cover battery replacement once I pluck up the courage to try it!).
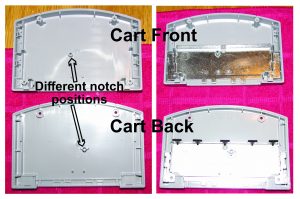
When the time comes to put your cart back together, you will find Nintendo have thoughtfully added a number of features to make reassembly a breeze. Firstly, you need to put the front of the RF shield into the front side of the cart. This is impossible to get wrong as the little round pegs on the inside of the cart are in slightly different places on the front and back half. There is also a cut-out slot which only the front half of the RF shield will fit into.
With this in place, you next need to put the black plastic part back onto the bottom of the PCB. Again, this is simple as the PCB helpfully has little notches to ensure the piece is placed correctly. If this is not correctly placed it will not fit back into the cart front as, once again, there are handy cut-out slots to ensure proper placing. the Back portion of the RF shield then clips back on top (this can require a little bit of force.
Remember to put the crosshead screws back into either side of the RF shield and then it’s just a case of aligning the clips at the bottom of the cart and closing the back portion to the front. Finally, screw the gamebit screws back into place and – voilá! – your cart is back in one piece!
I hope this is useful for anyone who is wary or worried about disassembling an N64 cart; once you’ve done it a couple of times, it really is a piece of cake!